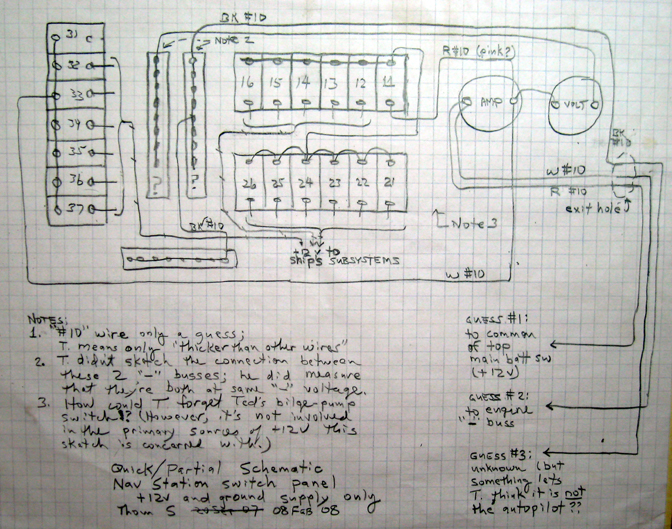
Nav station switches wiring
From MITNA
Description of 12-volt wiring in the Main Switch Panel is divided into two parts:
First, the wiring which brings 12-volt power to the "hot" feed of the switches/circuit breakers is shown.
Second, we plan to describe the wiring from the switched-12volt side of switches/CBs. It isn't clear to this writer exactly where we'll break these discussions out into the individual subsystems being controlled.
12-volt DC "hot" side of switches/circuit-breakers

- (above) Diagram of wiring bringing 12-volt "hot" (+) and "ground" (-) to switches/CBs
- (viewed from rear of switch panel)
GENERAL NOTES for diagram:
- There appear to be two uses of wires within the switch panel box:
- thicker wires serve multiple circuits, and are indicated on the diagram as #10 gauge, without really determining the actual wire size;
- thinner wires serve single circuits, and are NOT indicated with a wire gauge; again their actual sizes weren't determined, but might be #16 or so.
- Two circuits are not shown on this diagram:
- Note 3 on the diagram admits that the draftsman forgot to show the BILGE/SUMP pump switch; that came about because this switch is not connected to the other circuits on the main switch panel; see Systems List for its wiring.
- The XXXX switch and potentiometer circuitry on the starboard end of the main switch panel is not shown; the draftsman believes it is not associated with the current diagram's feeds from the batteries to the switch/CBs.
WALK-THROUGH of circuits:
- The 12-volt "+" and "ground" enter the panel through the EXIT HOLE where many wires enter and leave the control panel box, going from and to wiring bundles outside the EXIT HOLE, i.e. in the port-side cabinetry above and below the nav station desk.
- Guess #1 shows the red #10 ("thick") wire we believe is connected to the common terminals of the two main battery switches; it will have +12-volts when one or both of these switches are turned on.
- See Main_12-volt_Control_Schematic_Diagram diagram and walkthru of the main switches to locate our guess for this wire; note however that now [Feb08] this wire from main switch panel to the battery switches is mistakedly NOT SHOWN on the battery switch diagram, per its discussion paragraph 6.1.
- Guess #2 shows the ground (minus) side of this 12-volt feed, and is believed to go to the engine "-" buss on starboard brace of the engine; this is where battery "-" is also brought to.
- wiring for Guess #2's circuit will be traced later belowe.
- Guess #1 shows the red #10 ("thick") wire we believe is connected to the common terminals of the two main battery switches; it will have +12-volts when one or both of these switches are turned on.
- All current from the batteries (Guess #1 wire) goes through the ammeter before being distributed to switch/CBs in the Main Control Panel.
- However, the white #10 wire on the pre-measurement terminal of the ammeter goes directly back out the EXIT HOLE, and seems to power some circuitry unknown to man at this time. [QUESTION]
- The measured-current terminal of the ammeter (right-side on diagram) provides 12-volt "+"
- to the voltmeter "+" terminal
- to switch 11 on the upper horizontal row of switches, which when ON will provide 12-volt "+" to the 11 other switches on the 2 horizontal rows of switch/CBs (numbered 12-16 and 21-26 on the diagram.)
- to the 7 switch/CBs in the vertical row (shown as numbers 31-37 (may only be 6 switches?)).
- Note that we expected this vertical row of switches to be powered through the main circuit breaker (switch 11) but it isn't.
- Guess #2's 12-volt "minus" is first routed to the vertical terminal strips.
- Note 2 mentions how the writer didn't find a wire between the two vertical terminal strips; however, they both seem to be connected to "-" somewhere [QUESTION]
- Ground is distributed from the two vertical terminal blocks
- to the voltmeter negative side
- to a horizontal buss-bar terminal strip mounted on the box which holds the main switch panel; this patently seems like an add-on.